Posts

Showing posts with the label Welding

Better battery Box

Image
Picking up from " Danger Low Voltage! ".... After the batteries drained while sitting I decided to make some improvements to the battery box.  The acrylic see-through top was neat but it was unnecessary to see through the sides of the " aquarium " and the acrylic panels weren't very strong and cracked easily so I decided to change to aluminum everywhere except the top.  

Butt ugly bumpers no more

Image
In my humble opinion, the BMW coupes were designed for thin chrome bumpers.  That's how they were originally drawn and built in the guise of the late 60s 2000 CS coupes.  When the larger 6 cylinder engine was installed, BMW put rubber strips and bumper overriders onto the bumper, ruining the clean look.  Even worse, US safety requirements forced BMW to pull the bumpers out away from the body to absorb 5 MPH bumps without damage.  Practical perhaps, but ugly.  Butt ugly.

Metal finishing, not finished

Image
The car is back with Tyler to finish the metal finishing.  This will address a lot of the remaining issues, and some new ones.   The idea is to minimize any body filler required for paint.  At this point there isn't a drop on the car.  It is all steel.  

Good under the Hood

Image
When I went to install the hood it wouldn't close.  One of the underhood braces interfered with the battery box.  Some surgery was required.  We bolted a brace to the hood so that the shape wouldn't be altered and then cut out a portion of the brace, leaving as much depth there as possible to maintain strength.  We took the cut out portion and flipped it upside down inside the void to reenforce the area and then filled it with some crumbled up aluminum foil.  We reinstalled the hood and closed it to make an impression in the foil.

Tying up Loose Ends

Image
Almost all of the EV conversion work is now done.  A few of the things recently taken care of: On the test drive the brake pedal went to the floor.  This was because the pedal itself rotated on the pivot point.  I thought it was secured at the factory and all pivoting happened at the pivot tube but I was wrong so had to TIG weld the pedal to the pivot.

Plugged In

Image
The onboard charger and battery management system have been in the car for a while but until today I had no way of adding electricity to the car.  I bought a J1772 receptacle a while back but hadn't got around to fabricating a way to mount it to the car.  

Batteries in the Front, Batteries in the Rear

Image
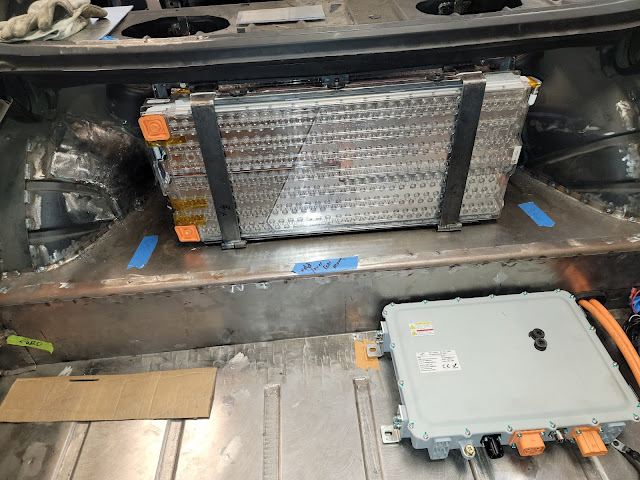
With 10 Tesla Model S batteries up front, the job is only 71% done.  Because the Tesla drive unit needs a minimum of 272 volts to operate, and each module has up to 28 volts, there would be basically zero range with 10 fully charged modules.  Therefore, I need to add at least 4 more modules to the car somewhere to get any power or range.

Suspended upside down

Image
 The rear suspension on a BMW 3.0 CS is supported by a rear crossmember that spans the width of the car, with the trailing arms mounted to clevises and the ends bolted to the car via rubber bushings. As mentioned previously in the Brace up Boys post, the crossmember is normally triangulated by the differential, which is mounted to the floor of the unibody, but I cut the diff mount off of the crossmember since it is in the way of where the Tesla drive unit needs to sit.  I then fabricated a new forward-facing member to triangulate the crossmember securing the the car.  Seemed good.

Stop, park, but don't roll

Image
The Tesla drive unit only has Forward, Reverse and Neutral. There is no Parking pawl. On a real Tesla there are electric worm-drive parking brake calipers that clamp down on the rear discs when park is engaged and stay there even when power is cut. Paul adapted those to his car because he was already fabricating new caliper mounts for his Wilwood upgrade but I'm sticking with stock brakes so that wasn't an option for me. Initially I thought I'd just flash a "Pull Hand Brake" type message on the dash app when you engaged Park but I found a better solution with a product called eStopp.

Batteries, batteries, batteries

Image
The Tesla Model S battery system in my car consists of 14 individual modules (a real model S usually has 16). Each are 27 by 11.5 by 3.5 inches in dimension and weigh 55.8 pounds. They consist of 444 individual 18650 battery cells with 74 cells in each voltage cell and six of these voltage cells in series.

Brace up boys

Image
As mentioned previously, with the differential mount cut off the rear suspension I needed a new way to properly locate and secure the rear suspension member.  Tyler fabricated a long arm that welds to the front side of the member and travels forward into the old driveshaft tunnel.  Of course, I no longer have a driveshaft so that room is up for grabs now.  Using a motor mount from a Chevrolet Suburban, we welded a mount to the tunnel and bolted the new arm to the body via the rubber mount.  This is solid fore/aft but allows a bit of up/down swing if necessary.

Mounting the Motor

Image
Tesla motor, axles, and batteries have arrived. Unlike Paul, who is using the large Tesla motor, I have opted for the small rear drive motor. My goal is 300 hp and 200 miles of range. Not the 450 hp Paul is shooting for. 300 seems like plenty to me, given the stiffness (lack thereof) of our skinny pillared unibodies. Plus, the small motor sheds 100 pounds vs the large motor and is physically smaller, allowing more battery placement flexibility. Tesla Model S drive unit and axles.  I only need the inner CVs from the axles as they are much too long for the narrower BMW Like Christmas, 14 Tesla Model S battery modules, packed in foam The Tesla batteries are temporarily stored in a wooden rack The packing foam is useful for testing fitment of the batteries This first step in getting the drive unit into the car is to re-enforce the rear of the car to support it and provide the necessary mounting points. Plenty of space to work with now Strengthen those wheel tubs as much as possible We ...

Rust never sleeps

Image
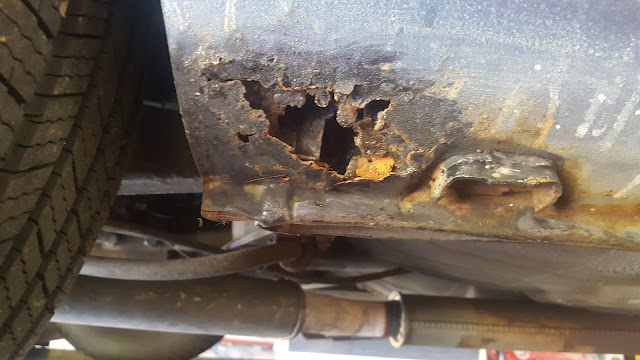
The truth is, most of the time spent in this "EV conversion" has been spent on body work having nothing to do with the EV project. I knew there was some rust in the right-side floor and in the rear corners of the rockers but we also found rust: Between the roof and the sunroof frame In the lower front fenders In the left rear floor panel In the pinch weld of the rockers In the front and rear window frames To be safe, we removed the entire sunroof structure, fabricated a new portion of the roof, welded it in, and then replaced the sunroof.  Getting the roof curve correct and straight has been very time consuming. To be safe, we removed the entire outer rocker so that we could see the condition inside.  It was fine but at least know we know that for sure.   To be safe, we replaced the lower section of the quarters and fenders on both sides. We replaced both rear floor sections and patched the front. At least now we ...

No going back now

Image
The Tesla parts should arrive in a couple weeks. In the meantime, we've cut out the trunk area in anticipation of the motor install (I'm using the smaller Tesla rear-drive unit, by the way) so there's no going back now. The goal is 294 HP and 200 miles of range. There are still many, many details (battery placement, P/S, P/B, A/C, cooling, etc., etc.) to figure out.