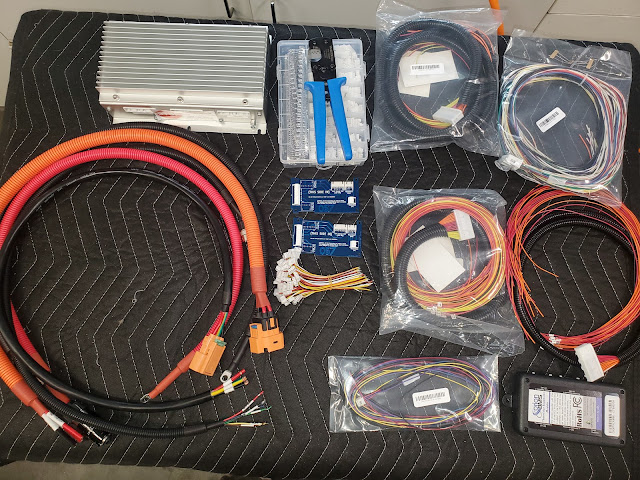
Battery Box Assembly Line
Building a box to hold batteries sounds so simple. It isn't.
The batteries have been in and out of my front box many times now. The latest reasons for disassembly were to relocate the BMS and plate the buss bars. While plating, we decided to do the buss bars in Paul's car also since the battery box is out of the car while the car is being painted.
 |
| My box on the left, Paul's on the right |
It is interesting to see the two approaches to battery fitment side by side. Figuring out how to get 14 Tesla Model S battery modules fitted into a car designed for a gas engine and transmission is always the most difficult part of the EV conversion process. The big rectangular batteries just don't want to fit into the curvy voids of a normal car body.
Paul went to great lengths to free up space in his engine compartment by relocating the brakes and steering. He then used Tyler's aluminum welding skills to build a box out of aluminum rails and skin, with steel end panels for access. With the steering box replaced by a low-mounted rack and pinion from a VW, he was able to get 12 batteries in front.
 |
| Paul's battery box really fills up his engine compartment |
I took a more conservative approach, leaving the stock steering in place and placing the batteries around it. While I had to jump through a lot of hoops to make room for the brakes, I managed to leave the master cylinder and power booster largely in the same location as stock, albeit pushed to the side quite a bit. Given that battery technology is likely to improve significantly in the coming years, I didn't want to spend too much time and money building a fancy aluminum box and instead opted for a simpler steel frame with acrylic skin. End the end, I probably spent more time and money on my box than Paul did and having to work around the steering box meant I only managed to fit 10 modules in front, as opposed to Paul's 12.
 |
There isn't a lot of extra room in my engine compartment either but I do have my brake system on the left |
 |
| With 12 up front, Paul only had to put two batteries in the back |
 |
| I have 4 batteries in the back of my car |
Paul's setup has two batteries flat on the bottom, running front to back, followed by 9 vertically and then topped by a single module sideways up top. The overall height of the box was just a bit too high so he had to relieve some room in the hood. bracing for clearance.
 |
| There are two more batteries underneath all these |
My box has 9 modules flat running front to back in a Jenga-like configuration with two low in the middle and then two columns above. I too have one module sideways on top. My box is narrower than Paul's so the top battery extends beyond the width of the box, requiring a funky "bubble" in the skin to cover it.
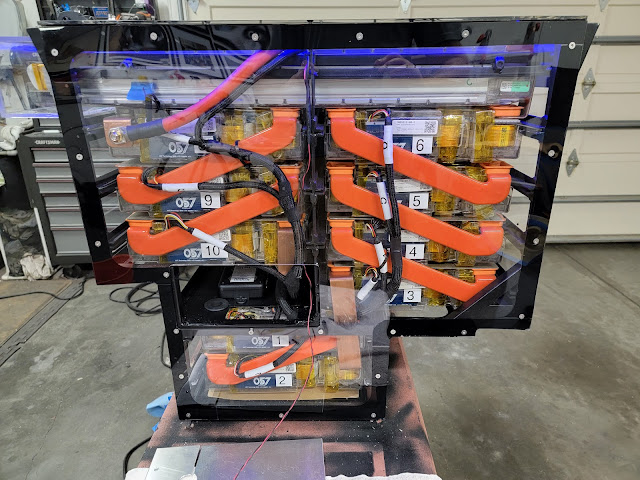 |
| My configuration -- I've replaced the one cable with a buss bar since this photo |
Having just re-assembled both boxes I can say that I'm very happy with my solution. Having an open framework with bolt-on skin panels makes it much easier to work on than Paul's box with fixed sides -- there's just more access. The weight difference is not existent also. The steel front and back on Paul's box weigh a lot more than my 1/8" thick plastic skin and cancel out any weight savings gained from the use of aluminum elsewhere.
Either way, both boxes have very specific and challenging assembly sequences that must be performed with care since you are dealing with 350 volts of energy storage. I managed to connect all my modules with copper buss bars while Paul's box has a few 0/2 gauge battery cables inside. Paul's box contains the pyro fuse inside while I added a large fuse inside my box and kept the pyro fuse in the factory Tesla wiring near the motor in back. Paul mounted his BMS in the cabin of the car while I attached mine to the box, requiring another wart-like "bubble" in the skin of the box.
 |
| My BMS bubble |
Although I've had to rethink the manifold design, I designed the battery cooling lines for my box from the start. Paul drove his car for a year without battery cooling but while we had it apart, we began adding the plumbing to his box. It was very challenging to get hoses up to his top-most battery and finding room for the coolant manifolds was difficult.
 |
| Not the final cooling configuration but planned from the start |
 |
| Coolant manifolds mounted in Pauls' box |
 |
| Coolant manifolds in my box |